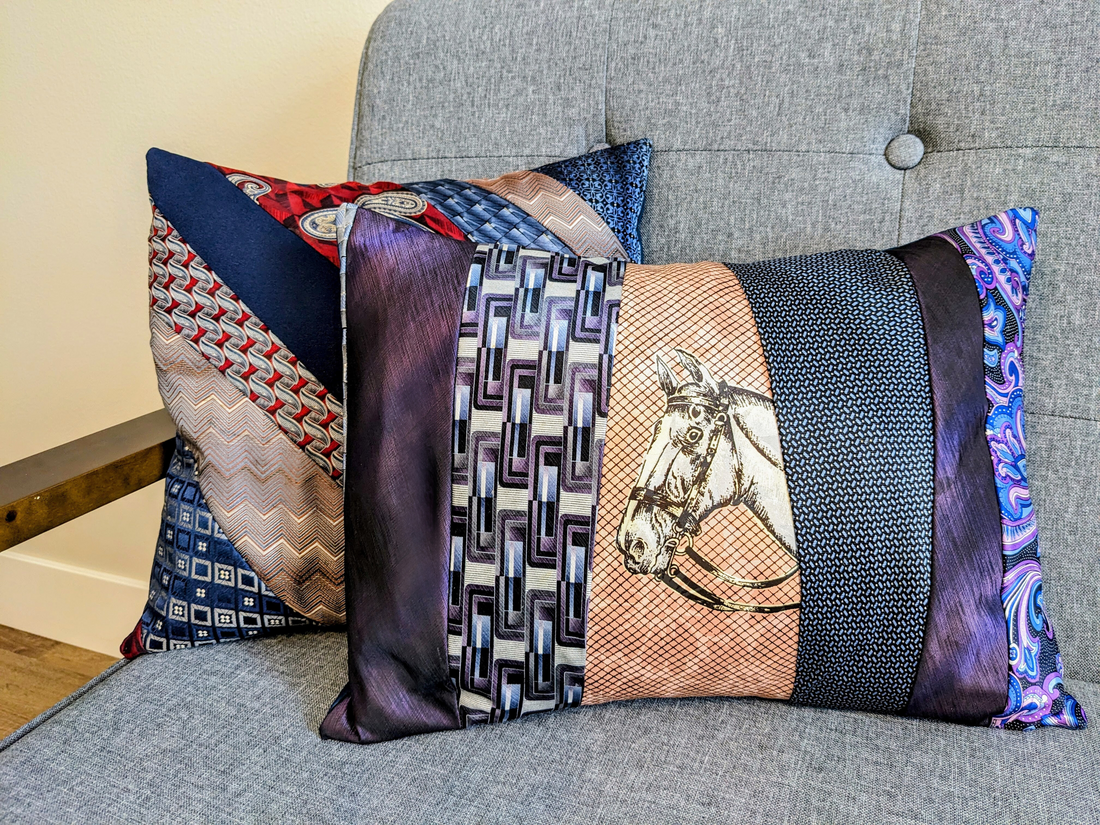
Here is a tutorial how I made pillows from ties!
Do you have ties from a loved one that you would like to make something with or have you ever wanted to make a memory pillow from ties? My aunt asked me if I could make some pillows from my grandfather's ties. I said yes first and then panicked because I didn't want to mess it up. Here is my journey from start to finish and hopefully it can help you on your journey as well!

Most of the ties were dirty. I did a lot of research on cleaning them, and since some were silk, I didn't want to send them to a dry cleaners. So, I used a small amount of club soda and a cotton ball and dabbed the tie where it was dirty. Don't make the ties too wet. I let them dry and repeated as needed. There were still a few spots that I did not get out and I just didn't use that part of the tie. Overall, I was happy with how they cleaned up.

Next, I removed the lining from all the ties to reduce bulk when sewing them together. I used a seam ripper to remove the linings and tags.

I bought pillow inserts to go inside the pillow covers. This helped when deciding what size to make the pillows. I used a 14" x 14" pillow insert and a 12" x 16" pillow insert.
For reference, I used 8 ties for the 14" square pillow (on the diagonal), and used 7 ties for the 12" x 16" pillow (placed vertically). The number of ties will vary depending on the width of the ties. You can possibly use each tie twice if you are ok with thicker and thinner pieces.
Next, I cut 2 pieces of cotton fabric that I sewed the ties onto for stability. This fabric needs to be 1/2" larger than the pillow size. One was 14.5" square and the other was cut to 12.5" x 16.5" rectangle.
I laid the ties out on the cut fabric to get the layout I wanted.
NOTE: When sewing the ties onto the fabric, I used a walking foot. This helped with tension with different material types. I also used polyester thread.
Then, I chose the tie I wanted in the middle and sewed it to the fabric. I opened up the tie and sewed on the fold to keep the shape of the tie. I did not cut away extra fabric. You can do this once you sew it down if you prefer.

I worked my way out from the center, laying the next tie face down on the tie that was already sewn. I pinned all the way down the tie to decrease movement. I made sure the folded line matched the folded line of the tie underneath.

Open up the tie and pull gently to lay flat. I pinned it down and then added the next tie face down on top. Pinned that down and sewed the 2 layers of ties to the fabric beneath it.

Repeat until the fabric is covered in ties.
If sewing ties vertically, sew ties to the edge of the cotton fabric before trimming. I did this from the back so I could tell where the edge of the pillow will be.

After all the ties are attached, I trimmed the ties to the size of the fabric that I sewed them onto.

Then I sewed a 1/8" seam around the perimeter.

Now it's time to make the back of the pillows. I cut 2 pieces of fabric per pillow for the backing. (2) 14.5" x 10" of the backing fabric for the 14" square pillow and (2) pieces of 12.5" x 10" for the 12" x 16" pillow.
Finish one seam per backing fabric (both pieces need a finished seam in the middle) where they will overlap in the middle.

Lay ties facing up. On top, lay the backing fabric face down. Pin all 3 pieces into place.
Sew 1/4" seam around the perimeter of the pillow sandwich.
Turn fabrics inside out and you have a completed pillow cover! Insert pillow inserts and it is done!


I hope this tutorial has helped you!
Amber